I made it back from Boston. The trip was fun but I did not get as much done as I would have at home. Things are looking to be pretty busy this week as I scramble to get caught up. The wedding is in a few weeks. 10 days on the beach in the Bahamas. That thought is what's getting me through the work and stress.
In other news, I'm starting a new project in my spare time. I'm going to keep things under wraps for a bit as I don't have a solid time frame. However, one thing I will mention is that it's going to be a webapp and it's going to contain a social component. I'm hoping the development will yield a series of useful Groovy/Grails blog posts.
I'd also really like to pull together a generic "web 2.0 template" project in Grails. Something that would pull together plugins for security and contain User, Profile, Role-type domain classes, controllers, and views. Ideally you should be able to use it to bootstrap a generic Web 2.0 site with all of the user registration and profile management taken care of. Then you can start adding your specific domain classes to make the site useful.
Monday, March 31, 2008
Friday, March 28, 2008
Let's Get Crackin'
We had dinner at the Barking Crab last night:

Definitely a highlight. It was a really good dinner and I think we looked exceptionally good in our bibs.

Definitely a highlight. It was a really good dinner and I think we looked exceptionally good in our bibs.
Thursday, March 27, 2008
Blogging from Boston
I'm currently at the National Science Teacher Association (NSTA) national meeting in Boston. I'm just here to help out with the ANDRILL booth and get some much needed face to face time with my co-workers (something we don't often get since I work remotely). The trip has been fun so far, though not as productive as being at home.
I took a few minutes today to fix a bug in the Simile Timeline depth code--when scrolling the timeline, the overview bars would get out of sync. If you're using the depth unit extension, please grab the latest version or check out the diff. I've also updated the Simile Grails plugin, so you may want to update your version from the repository. It fixes the same depth bug and updates the SimileTagLib to work a bit more independently from the domain classes.
I took a few minutes today to fix a bug in the Simile Timeline depth code--when scrolling the timeline, the overview bars would get out of sync. If you're using the depth unit extension, please grab the latest version or check out the diff. I've also updated the Simile Grails plugin, so you may want to update your version from the repository. It fixes the same depth bug and updates the SimileTagLib to work a bit more independently from the domain classes.
Monday, March 24, 2008
Customizing Timeline Event Bubbles
Tonight is a two for one special on blog posts. I'm heading out to Boston tomorrow for the rest of the week, so I don't know how much time I'm going to have to blog while out there. If you happen to be reading and are going to be in the Boston area (either for the NSTA meeting like me or whatever), shoot me an email and let's meet up for a beer.
In this post, I'm going to show you how to customize the rendering of event bubbles in Simile Timeline. The default bubbles look pretty nice:
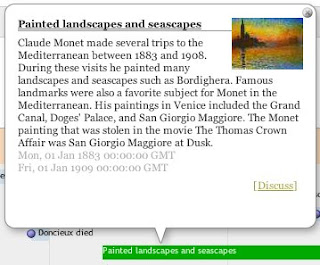 but they lack a few features that I needed, namely clicking on the thumbnail (if present) should take the user to the event link and the start and end depth should be rendered on a single line:
The markup for the event bubble is built programmatically in the fillInfoBubble() function on Timeline.DefaultEventSource.Event class. You can find the code at the end of the sources.js file in the Timeline distribution.
To customize the event bubble rendering, we just need to modify the fillInfoBubble() function and make it generate the markup we want. One option would be to go in and edit the sources.js file directly. This would accomplish our goal but it would mean we'd be modifying the Timeline source code and we would have to patch the file every time it was changed in the Timeline trunk.
The second option is to replace the function "on the fly" by modifying the Timeline.DefaultEventSource.Event prototype in our own code. The end is the same but we can do it without touching the Timeline sources. To accomplish this, we just need to overwrite the function after sources.js loads:
What this code does is create an anonymous function that runs immediately. Inside that function, we replace the current fillInfoBubble() implementation on the Event class with our own.
This code is an improvement over editing sources.js directly, but we can do one better. The problem with this approach is that we're replacing fillInfoBubble() for everyone. We're breaking any clients that depend on the old implementation, which is just bad form. What we'd really like to do is selectively apply our new implementation. Fortunately that's easy enough to do:
In this updated snippet we save the old function implementation then we check to see if the labeller is a DepthLabeller. If it isn't, we just pass it on to the original implementation, otherwise we use our customized implementation.
For completeness sake, here's the snippet I used to make the thumbnail image clickable and to render the depths on the same line:
Hope that was clear as mud!
In this post, I'm going to show you how to customize the rendering of event bubbles in Simile Timeline. The default bubbles look pretty nice:
 but they lack a few features that I needed, namely clicking on the thumbnail (if present) should take the user to the event link and the start and end depth should be rendered on a single line:
The markup for the event bubble is built programmatically in the fillInfoBubble() function on Timeline.DefaultEventSource.Event class. You can find the code at the end of the sources.js file in the Timeline distribution.
To customize the event bubble rendering, we just need to modify the fillInfoBubble() function and make it generate the markup we want. One option would be to go in and edit the sources.js file directly. This would accomplish our goal but it would mean we'd be modifying the Timeline source code and we would have to patch the file every time it was changed in the Timeline trunk.
The second option is to replace the function "on the fly" by modifying the Timeline.DefaultEventSource.Event prototype in our own code. The end is the same but we can do it without touching the Timeline sources. To accomplish this, we just need to overwrite the function after sources.js loads:
(function() {
Timeline.DefaultEventSource.Event.prototype.fillInfoBubble = function (elmt, theme, labeller) {
// build our custom markup
};
})();
What this code does is create an anonymous function that runs immediately. Inside that function, we replace the current fillInfoBubble() implementation on the Event class with our own.
This code is an improvement over editing sources.js directly, but we can do one better. The problem with this approach is that we're replacing fillInfoBubble() for everyone. We're breaking any clients that depend on the old implementation, which is just bad form. What we'd really like to do is selectively apply our new implementation. Fortunately that's easy enough to do:
(function() {
var default_fillInfo = Timeline.DefaultEventSource.Event.prototype.fillInfoBubble;
Timeline.DefaultEventSource.Event.prototype.fillInfoBubble = function (elmt, theme, labeller) {
   // if not a depth labeller, use the original
   if (!labeller.isDepthLabeller) {
       default_fillInfo.apply(this, arguments);
       return;
   }

   // build our custom markup
};
})();
In this updated snippet we save the old function implementation then we check to see if the labeller is a DepthLabeller. If it isn't, we just pass it on to the original implementation, otherwise we use our customized implementation.
For completeness sake, here's the snippet I used to make the thumbnail image clickable and to render the depths on the same line:
if (image != null) {
   var img = doc.createElement("img");
   img.src = image;
   theme.event.bubble.imageStyler(img);

   if (link != null) {
       var a = doc.createElement("a");
       a.href = link;
       a.target = "_blank"
       a.appendChild(img);
       elmt.appendChild(a);
   } else {
       elmt.appendChild(img);
   }
}

var divTime = doc.createElement("div");
if (this.isInstant()) {
   divTime.appendChild(elmt.ownerDocument.createTextNode(labeller.labelPrecise(this.getStart())));
} else {
   divTime.appendChild(elmt.ownerDocument.createTextNode(labeller.labelPrecise(this.getStart())));
   divTime.appendChild(elmt.ownerDocument.createTextNode(" - "));
   divTime.appendChild(elmt.ownerDocument.createTextNode(labeller.labelPrecise(this.getEnd())));
}
Hope that was clear as mud!
Grails Query By Example Gotcha
This is not actually a gotcha in Grails but more a gotcha in my domain class. However, it seems like it might be a common enough scenario to trip up someone else.
I have a domain class which I am populating from an uploaded Excel spreadsheet. Each row in the spreadsheet corresponds to a new instance of the domain class. Since I anticipate that my users will try to upload spreadsheets with errors in some of the rows (not pessimistic, just realistic), I want my app to accept all rows that are properly formatted and provide useful error messages for the rows that are not. I created a spreadsheet that exercised all of my error cases and ran into an unexpected outcome: every time I uploaded the spreadsheet I got duplicates of all of the valid rows in the spreadsheet.
This was surprising because I was using the query by example facilities to check and see if the row was a duplicate. Despite not changing the spreadsheet between uploads, I was still getting duplicates. Then it dawned on me--I had a Date created = new Date() field in my domain class to keep track of when the domain class was created. Simply adding an example.created = null to my query example solved the problem.
Like I said in the opening paragraph, not a gotcha in Grails. The query by example stuff works exactly how I expect it to, you just have to watch out about initialized fields.
Friday, March 21, 2008
Grails Excel File Download
This is the companion to my previous "Grails Excel File Upload" post. In this post, I'll show how to create and send an Excel spreadsheet from your Grails webapp.
The first thing you'll need to do is go out and grab JExcelAPI if haven't already. JExcelAPI will let you read and write Excel spreadsheets from Java. Drop the jxl.jar in your webapp's lib directory.
In my app, I'm providing Excel download functionality from a couple different controllers, each with a different list of domain objects. To enable the highest degree of re-use, I wrote a generic utility method for serializing an object to a row in an Excel spreadsheet:
Edit: See Ted's comment on this post about using eachWithIndex() instead of keeping track of the r and c vars yourself.
This method takes an OutputStream, like the ServletOutputStream you can get from response.outputStream; a map of property names and "nice" header titles; and a list of objects to write to the spreadsheet.
Then I call it from my controller with appropriate values:
The final piece of the puzzle is to make sure you set your content type and content disposition headers before you call the writeExcel() method:
The nice part about the writeExcel() method is that it works with just about any list of objects and can easily be customized. For example, in another place in my app, I let the user download all of the sample request domain objects associated with them. To do that, I use nearly the same code:
I removed a few redundant/unimportant properties from my header map and call the writeExcel() method with the list of SampleRequests associated only with that user.
The first thing you'll need to do is go out and grab JExcelAPI if haven't already. JExcelAPI will let you read and write Excel spreadsheets from Java. Drop the jxl.jar in your webapp's lib directory.
In my app, I'm providing Excel download functionality from a couple different controllers, each with a different list of domain objects. To enable the highest degree of re-use, I wrote a generic utility method for serializing an object to a row in an Excel spreadsheet:
 import jxl.*
 import jxl.write.*

...

 static def writeExcel(out, map, objects) {
     // create our workbook and sheet
     def workbook = Workbook.createWorkbook(out)
     def sheet = workbook.createSheet("Requests", 0)

     // walk through our map and write out the headers
     def c = 0
     map.each() { k, v ->
         // write out our header
         sheet.addCell(new Label(c, 0, v.toString()))

         // write out the value for each object
         def r = 1
         objects.each() { o ->
             if (o[k] != null) {
                 if (o[k] instanceof java.lang.Number) {
                     sheet.addCell(new Number(c, r, o[k]))
                 } else {
                     sheet.addCell(new Label(c, r, o[k].toString()))
                 }
             }
             r++
         }
         c++
     }

     // close
     workbook.write()
     workbook.close()
 }
Edit: See Ted's comment on this post about using eachWithIndex() instead of keeping track of the r and c vars yourself.
This method takes an OutputStream, like the ServletOutputStream you can get from response.outputStream; a map of property names and "nice" header titles; and a list of objects to write to the spreadsheet.
Then I call it from my controller with appropriate values:
     def header = [:]
     header.id = "Id"
     header.investigator = "Investigator"
     header.hole = "Hole"
     header.top = "Interval Top (mbsf)"
     header.bottom = "Interval Bottom (mbsf)"
     header.samplesRequested = "Samples Requested"
     header.sampleSpacing = "Sample Spacing (m)"
     header.sampleType = "Volume/Type"
     header.sampleGroup = "Group/Discipline"
     header.notes = "Notes"
     header.status = "Status"
     header.priority = "Priority"

     ExcelUtils.writeExcel(response.outputStream, header, SampleRequest.findAllByHole(hole))
The final piece of the puzzle is to make sure you set your content type and content disposition headers before you call the writeExcel() method:
    // set our header and content type
    response.setHeader("Content-disposition", "attachment; filename=${hole}-requests.xls")
    response.contentType = "application/vnd.ms-excel"
The nice part about the writeExcel() method is that it works with just about any list of objects and can easily be customized. For example, in another place in my app, I let the user download all of the sample request domain objects associated with them. To do that, I use nearly the same code:
     // set our header and content type
     response.setHeader("Content-disposition", "attachment; filename=${user}-requests.xls")
     response.contentType = "application/vnd.ms-excel"

     // define our header map
     def header = [:]
     header.id = "Id"
     header.hole = "Hole"
     header.top = "Interval Top (mbsf)"
     header.bottom = "Interval Bottom (mbsf)"
     header.samplesRequested = "Samples Requested"
     header.sampleSpacing = "Sample Spacing (m)"
     header.sampleType = "Volume/Type"
     header.sampleGroup = "Group/Discipline"
     header.notes = "Notes"

     ExcelUtils.writeExcel(response.outputStream, header, SampleRequest.findAllByUser(user))
I removed a few redundant/unimportant properties from my header map and call the writeExcel() method with the list of SampleRequests associated only with that user.
Thursday, March 20, 2008
And the match is...
Minneapolis. We were pretty sure Elizabeth would match here since it is a big program and she had strong recommendations from a lot of the doctors in the program but it was still a little stressful. With that hurdle out of the way, I'm off to Boston next week for the NSTA national meeting. I'm just there helping out with the ANDRILL booth, so hopefully I can find plenty of time to work as things are shaping up to be a death march until I leave for the wedding on the 17th. We're rolling out a new sample request management system on April 1, revamping the whole ANDRILL website right around then, and preparing for the SMS post-drilling workshop at the end of April. I can't tell you how much I'm looking forward to spending a week on the beach in the Bahamas.
Wednesday, March 19, 2008
Grails Excel File Upload
Just like most things in Grails, parsing data from an uploaded Excel file is relatively easy. The first thing I did was go out and grab JExcelAPI. JExcelAPI will let you read and write Excel spreadsheets from Java. It doesn't support all of the advanced features (like charts) of Excel, but for my needs it works well. You can also look at Apache POI for reading and writing more MS Office formats, and there's numerous other options if you're on Windows or want to plop down some money for a commercial library.
After dropping JExcelAPI into my lib directory, I went ahead and created a view to upload the spreadsheet. The form can be as simple or as fancy as you want, just as long as you have a file input field:
My spreadsheet has a fairly simple format with fixed columns, some being optional and some required, so I hard coded the column indices.
In a future blog post, I'll show how to output an Excel spreadsheet with Grails and JExcelAPI.
Edit: Blogger seems to have eaten some of the code when I updated tags so I just updated it.
After dropping JExcelAPI into my lib directory, I went ahead and created a view to upload the spreadsheet. The form can be as simple or as fancy as you want, just as long as you have a file input field:
Now we need to create the upload method in our controller to parse the Excel file:
<g:form action="upload" method="post" enctype="multipart/form-data">
<label for="file">File:</label>
<input type="file" name="file" id="file"/>
<input class="save" type="submit" value="Upload"/>
</g:form>
def upload = {
 // get our multipart
 MultipartHttpServletRequest mpr = (MultipartHttpServletRequest)request;
 CommonsMultipartFile file = (CommonsMultipartFile) mpr.getFile("file");

 // create our workbook
 Workbook workbook = Workbook.getWorkbook(file.inputStream)
 Sheet sheet = workbook.getSheet(0)

 def added = 0;
 def skipped = [];
 for (int r = 3; r < sheet.rows; r++) {
  // get our fields
  def top = sheet.getCell(0, r).contents

  def bottom = sheet.getCell(1, r).contents
  if (bottom == "") bottom = null

  def number = sheet.getCell(2, r).contents
  if (number == "") number = 1

  def spacing = sheet.getCell(3, r).contents
  if (spacing == "") spacing = 0.0

  def type = sheet.getCell(4, r).contents
  def notes = sheet.getCell(5, r).contents

  // check that we got a top and a type
  if (top == null || top == "") {
   // do nothing
  } else if ((new SampleRequest(
    "investigator":user,
    "hole":hole,
    "sampleGroup":group,
    "top":top,
    "bottom":bottom,
    "sampleType":type,
    "samplesRequested":number,
    "sampleSpacing":spacing,
    "notes":notes)).save()) {
   added++
  } else {
   skipped += (r + 1)
  }
 }
 workbook.close()

 // generate our flash message
 flash.message = "${added} sample request(s) added."
 if (skipped.size() > 0) {
  flash.message += "  Rows ${skipped.join(', ')} were skipped because they were incomplete or malformed"
 }
 redirect(controller:"home", action:"index")
}
My spreadsheet has a fairly simple format with fixed columns, some being optional and some required, so I hard coded the column indices.
In a future blog post, I'll show how to output an Excel spreadsheet with Grails and JExcelAPI.
Edit: Blogger seems to have eaten some of the code when I updated tags so I just updated it.
Tuesday, March 18, 2008
Screencasts on Macs
I've found myself doing a lot of screencasts recently. Screencasts are great for demonstrating software or techniques when you can't show the user directly. In some ways, a good screencast is even better than a good live demonstration because the user can go back and watch the screencast any time they want.
For creating screencasts on my Mac, I use iShowU. iShowU is one of the first pieces of software I purchased for my Mac. It's nice looking and easy to use. And it has a plethora of options to create videos in many formats and quality levels. At $20, it's a steal. I only wish it had an option to make me sound more intelligent and confident. I usually end up doing several takes before I'm not appalled with how I sound on video.
iShowU doesn't encode to Flash videos for the web, so that may be a non-starter for you. I usually just end up distributing the video file directly.
Monday, March 17, 2008
Anxious Anticipation
This is a pretty important week for Elizabeth and I. On Thursday we find out where she "matched" for her residency, which will dictate where we end up living for the next four or so years. Her top choice was to stay here in Minneapolis. The University of Minnesota has a really good program in what she is going into (MedPeds--a combination of Internal Medicine and Pediatrics). Her second choice is Milwaukee, WI. After that, the list includes Indianapolis, IN; Chicago, IL; Peoria, IL; and Rochester, NY.
Obviously Minneapolis would be the simplest all around option. We're already situated here, so we wouldn't have to worry about moving. Oddly enough, Milwaukee is also intriguing to me. Maybe it's the beer and brats. It's also still close enough that we could get back to see friends and family for the holidays and long weekends. The big downside to Milwaukee, or any place other than Minneapolis, is that we'd have to move on relatively short notice. We find out on March 20th and have to be moved by June 15th or so. Factor a wedding and a reception into that timeframe and we've only got about a month to find a place and get moved in.
We're both waiting for Thursday with bated breath.
Friday, March 14, 2008
Simile Grails IE Bug Fixed
Just a quick post to let anyone interested in the Simile depth extension or Grails plugin that I fixed a small bug in IE that was preventing the depth stuff from loading. It's been pushed to the repository.
Wednesday, March 12, 2008
Simile Timeline and Grails
I just put the finishing touches on a Grails plugin for Simile Timeline. There's already the RichUI Grails plugin which provides a nice wrapper for incorporating Timeline into your Grails app. However, I couldn't use RichUI because it links to the libraries out at the Simile site instead of serving them up locally. This causes cross-domain issues when using my depth extension.
Developing the plugin wasn't too terribly difficult and it was a great opportunity to dig into the internals of Grails a bit. Its plugin architecture is pretty slick. I actually created my plugin directly inside the plugins directory of a webapp I was working on. This allowed me to develop on both the webapp and the plugin at the same time. It's a pretty nice way to work when you have a pretty decent understanding of which pieces you want to go in your webapp and which you want to go in your plugin.
My Simile Grails plugin does a bit more than just packaging the Timeline javascript for serving locally. I put together a handy SimileTagLib for including the libraries so you can simply throw a
You may be wondering why I called it the Simile plugin instead of the Timeline plugin or what have you. I actually made the plugin generic enough that if I have a need to later, I can package all of the Simile code in the same plugin. The Timeline code already relies on the Simile Ajax library, so the plugin actually packages both libraries.
Along with the taglib, I also created some Timeline-related domain classes for working with timelines and events. I used these domain classes to bootstrap the example webapp I was working on. I simply did a:
and I was up and running with a webapp that could create and edit timelines and events. Actually displaying the timelines took a bit more customizing, but not all that much.
I've made the source code for the completed webapp available via a Mercurial repository. The webapp gives you a CRUD style interface for creating timelines and timeline events. It supports both date-type of timelines as you see in the examples out at the Timeline site, as well as depth-type of timelines with my depth extension. I've put up a live demo on my development server at work. Feel free to play around with it by creating your own timeline and adding events. It'll stay up until as long as it isn't abused.
Developing the plugin wasn't too terribly difficult and it was a great opportunity to dig into the internals of Grails a bit. Its plugin architecture is pretty slick. I actually created my plugin directly inside the plugins directory of a webapp I was working on. This allowed me to develop on both the webapp and the plugin at the same time. It's a pretty nice way to work when you have a pretty decent understanding of which pieces you want to go in your webapp and which you want to go in your plugin.
My Simile Grails plugin does a bit more than just packaging the Timeline javascript for serving locally. I put together a handy SimileTagLib for including the libraries so you can simply throw a
<simile:ajax/>and a
<simile:timeline/>tag in your view and that will include the javascript libraries. I ran into a bit of a stumbling block when trying to do this because the Javascript code is actually in the plugin. Hardcoding the links wouldn't work because I would have to change the link every time I updated the plugin's version number (Grails installs a plugin as {plugin.name}-{plugin.version}). Fortunately, you can look up the plugin's name and version at runtime:
def p = PluginManagerHolder?.pluginManager.getGrailsPlugin('simile')
return "<script type="text/javascript" src="${request?.contextPath}/plugins/${p.name}-${p.version}/js/${lib}.js?"></script>"
You may be wondering why I called it the Simile plugin instead of the Timeline plugin or what have you. I actually made the plugin generic enough that if I have a need to later, I can package all of the Simile code in the same plugin. The Timeline code already relies on the Simile Ajax library, so the plugin actually packages both libraries.
Along with the taglib, I also created some Timeline-related domain classes for working with timelines and events. I used these domain classes to bootstrap the example webapp I was working on. I simply did a:
grails create-app timelines
cd timelines
grails install-plugin simile
grails generate-all Timeline  (domain class provided by the plugin)
grails generate-all TimelineEvent  (ditto)
grails run-app
and I was up and running with a webapp that could create and edit timelines and events. Actually displaying the timelines took a bit more customizing, but not all that much.
I've made the source code for the completed webapp available via a Mercurial repository. The webapp gives you a CRUD style interface for creating timelines and timeline events. It supports both date-type of timelines as you see in the examples out at the Timeline site, as well as depth-type of timelines with my depth extension. I've put up a live demo on my development server at work. Feel free to play around with it by creating your own timeline and adding events. It'll stay up until as long as it isn't abused.
Monday, March 10, 2008
Simile Timeline
Over the last week or so, I've been working on a webapp for managing expedition sample requests. One of the bigger challenges has been to find an effective way to visualize the sample requests. Traditional histograms and line graphs are an option, but they offer limited interactivity. I was hoping to find something more "snazzy" to let the users really explore the data.
I mentioned this in passing to my friend Doug Fils and he pointed me to Simile Timeline. Timeline is something I had seen in passing before but hadn't considered for this particular project. Timeline provides a Google Maps-type interface for exploring time-based data. I really liked the interface, but needed a way to put depth on the scale instead of time. It turns out I wasn't the only one looking for different units.
After chiming in on enhancement request, the original reporter, Charlie Kershner, sent me an email with the solution he'd come up with: use years, decades, centuries, and millennia as proxies for metric depth units. The conversion factors are all right, it's just the units that are wrong. This is a really clever solution, so I was glad Charlie passed it along. Using it, I had a working demo in about an hour.
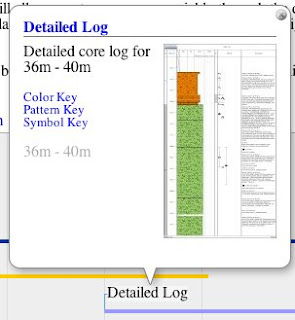
I decided to poke around in the Timeline code to see what it would take to properly support depths. It is a really coherently designed tool with well defined interfaces for extension and customization. I can't claim to be fully understand everything, but with a little monkey see, monkey do, and a bit of brute force, I got proper depth support:

This is the default rendering. I think for my application, I'll end up customizing the event painters. I need to find a way to simplify the rendering, especially in busy sections like this. There's also a fair number of errors in the data that I need to go back and fix. Being able to visualize it in this form makes it really easy to see the errors (Hint: those blue bars at the top and bottom of the main band represent typos in the data. There were no multi-meter samples...)
I don't have a live demo for people to play with because I'm working with "live" data that isn't public. However, there are numerous examples out at the Timeline site. There were a few gotchas I ran into while developing and testing things:
The code for the depth extension is available in a Mercurial repository where you can grab a zip of the most recent version. Feel free to use it however you like. I've offered to contribute the code to the main Timeline repository so future versions may not require you to host your own Timeline.
I mentioned this in passing to my friend Doug Fils and he pointed me to Simile Timeline. Timeline is something I had seen in passing before but hadn't considered for this particular project. Timeline provides a Google Maps-type interface for exploring time-based data. I really liked the interface, but needed a way to put depth on the scale instead of time. It turns out I wasn't the only one looking for different units.
After chiming in on enhancement request, the original reporter, Charlie Kershner, sent me an email with the solution he'd come up with: use years, decades, centuries, and millennia as proxies for metric depth units. The conversion factors are all right, it's just the units that are wrong. This is a really clever solution, so I was glad Charlie passed it along. Using it, I had a working demo in about an hour.
I decided to poke around in the Timeline code to see what it would take to properly support depths. It is a really coherently designed tool with well defined interfaces for extension and customization. I can't claim to be fully understand everything, but with a little monkey see, monkey do, and a bit of brute force, I got proper depth support:

This is the default rendering. I think for my application, I'll end up customizing the event painters. I need to find a way to simplify the rendering, especially in busy sections like this. There's also a fair number of errors in the data that I need to go back and fix. Being able to visualize it in this form makes it really easy to see the errors (Hint: those blue bars at the top and bottom of the main band represent typos in the data. There were no multi-meter samples...)
I don't have a live demo for people to play with because I'm working with "live" data that isn't public. However, there are numerous examples out at the Timeline site. There were a few gotchas I ran into while developing and testing things:
- You need to serve your own copy of Timeline because of cross-domain issues with mixing code from the Simile site and from a local extension.
- You need to tell Timeline to use your new unit in two different places--when you create the event source and when you actually create the timeline. Failure to do so will have you pulling out your hair chasing down errors.
- You need to use your customized methods to create your bands
- Not all of the rendering options (like showEventText: false) seem to work. I think this is because I don't fully understand the rendering pipeline and how it is customized. This is one area I'm going to be looking at in the future.
var tl;
function onLoad() {
var eventSource = new Timeline.DefaultEventSource(new SimileAjax.EventIndex(Timeline.DepthUnit));

 var theme = Timeline.ClassicTheme.create();
 theme.event.bubble.width = 320;
 theme.event.bubble.height = 220;
 var d = Timeline.DepthUnit.wrapDepth(0)
 var bandInfos = [
     Timeline.Depth.createBandInfo({
         eventSource:    eventSource,
         date:           d,
         width:          "80%",
         intervalUnit:   Timeline.DepthUnit.METER,
         intervalPixels: 100
     }),
     Timeline.Depth.createBandInfo({
         eventSource:    eventSource,
         date:           d,
         width:          "20%",
         intervalUnit:   Timeline.DepthUnit.DECAMETER,
         intervalPixels: 25,
         overview:       true,
         convertToBaseUnit: true
     })
 ];
 bandInfos[1].syncWith = 0;
 bandInfos[1].highlight = true;

 tl = Timeline.create(document.getElementById("tl"), bandInfos, Timeline.HORIZONTAL, Timeline.DepthUnit);
 tl.loadJSON("samples.js", function(json, url) {
     eventSource.loadJSON(json, url);
 });
}
var resizeTimerID = null;
function onResize() {
 if (resizeTimerID == null) {
     resizeTimerID = window.setTimeout(function() {
         resizeTimerID = null;
         tl.layout();
     }, 500);
 }
}
The code for the depth extension is available in a Mercurial repository where you can grab a zip of the most recent version. Feel free to use it however you like. I've offered to contribute the code to the main Timeline repository so future versions may not require you to host your own Timeline.
Saturday, March 08, 2008
A Java on Linux Aside
So I promised a technical post but I ran into a few problems Friday afternoon that ate several hours of my evening. I was trying to deploy a Grails webapp onto a CentOS server of mine. CentOS wasn't by choice, it was dictated to me. I have much more experience with Debian and it's related derivatives like Ubuntu. Anyhow, I was trying to deploy a Grails app but it required Java 1.5/5 and all that was installed was Java 1.4.2. And to make things worse, it was the GCJ version of Java. I understand the philosophical arguments behind what the GCJ folks' reasoning. Sun's Java licensing terms wouldn't allow Linux distros to re-distribute the code. The GCJ have put together a completely free, completely re-distributable version of Java. The problem is, it just doesn't always work as well as Sun's JDK. The blame is as much the application developers as it is GCJ. But to make a long story short, my Grails webapp wouldn't work with "Java" as it is installed on CentOS.
This Java problem is/was (now that new versions of Java are open source) common to all distros. One thing that surprised me about CentOS, was that they didn't have a repository with Java pre-built and packaged. On Ubuntu, all I had to do was add a "non-free" repository and I could install the Sun JDK straightaway. And, once installed, it integrated directly with the system. On CentOS, I had to download the Java binary from Sun. Then I had to download a source RPM from another place. Then I had to manually edit the RPM spec file to match the version of the JDK I got. And then I had to setup an RPM build environment and rebuild the Java RPM with the binary bits from Sun. That ended up taking over an hour to get everything set up properly.
Once I finally got the RPM built, I thought my troubles were over. I manually installed the shiny new RPMs that I built, updated the alternatives, and checked to ensure that 'java -version' was calling the Sun JDK. So done and done I thought, but I was wrong. Imagine my surprise when I started up Tomcat 5 and it was still using the GCJ version of Java. What gives?! I made sure the default Java was the Sun JDK. So then I decided I'd never need the GCJ Java, so I decided to uninstall it completely. Imagine my surprise when Tomcat 5 decided it needed to uninstall itself with the GCJ Java.
I fiddled around with it for another hour trying to get things to work with no luck. So I ended up manually installing both the Sun JDK and Tomcat 5 in /opt and will manage it myself. This finally got things to the point where I could deploy my Grails app however, I lose all of the system integration. A user on the server can no longer just type java and expect it to work. They have to fiddle with their path and their JAVA_HOME variables to make things work. I guess the biggest disappointment to me was that I ended up settling on the solution that I had used several years ago while working on RedHat boxes. After all these years, and the advent of their 'yum' package management system, and even generating packages by hand, you still can't get the Sun JDK package to integrate properly with RedHat/CentOS.
I'm not saying it's RedHat's or CentOS's fault. I guess I've just had better experience with Debian/Ubuntu. I don't know if it's me and my rusty experience with RedHat-based distros, the (lack of) documentation, or the package management system. I'm sure it's a bit of all of them.
All in all, the Java situation is a mess on all of the major platforms. I think Windows got their growing pains out of the way early with the whole Microsoft Java fiasco. On Linux, it's been the inability to re-distribute the Sun JDK because of licensing issues. That should improve now that the newer versions of Sun's JDK are open source. Finally, the Java situation on Macs is wearing my patience pretty thin. It's about time Apple gets a version of Java 6 out that runs on my laptop. I've already shelled out the money to upgrade to Leopard with the expectation that I'd be able to get the next version of Java.
In the next post, I'll be talking about some work I've been doing with Simile Timeline.
Thursday, March 06, 2008
Bacheloring it up
Elizabeth went to Rochester today through Sunday. She's having her final wedding dress fitting and a bridal shower. That leaves me and the cat to fend for ourselves. Tonight I had the boys over to watch some college basketball and to try out the cream stout Will and I just kegged. Everyone agreed that it turned out well.
Tomorrow I really need to finish up some Grails work I've been doing and to get a few screencasts shot. Since Elizabeth is gone, I'll probably end up working Saturday to catch up on some PSICAT work that I've fallen behind on. Apologies to anyone who's waiting on me. ANDRILL is keeping me busy.
Tomorrow I'll have a technical post. I haven't decide what yet, but I'll figure something out.
Wednesday, March 05, 2008
Automatic change tracking with cron and Mercurial
A while back I had to setup a system for sharing ANDRILL's expedition data among a geographically distributed group of scientists. For simplicities sake, I settled on serving the data via HTTP (for read only access) and WebDAV (for read/write access). It's not the most robust system, but it works, is relatively well supported across modern operating systems, and doesn't require users use some special software.
The only problem is that allowing read/write access to a large group of people means that something is going to get inadvertently changed or deleted. To combat this, I needed an automatic way to track changes that would allow me to revert or rollback any accidents.
The first step was to put the expedition data into a standard version control system. My VCS of choice is Mercurial, so I opted to use that. The initial import took a bit of time because there was about 30GB of files.
Once I had all of the data safely imported into a Mercurial repository, I needed a way to automatically detect and commit changes. I worked up a fairly simple shell script that gets run periodically by cron to check for and commit any changes:
The script is relatively straightforward. It will walk through a list of repositories (in this case, only 1 is configured). Fore each repository, it first cleans any dangling WebDAV lock files outside of the Mercurial metadata directory. Then it runs
The script is configured to run periodically (hourly) by cron. This has the side effect that if the same file is modified two separate times within the same hour window, the intermediate changes won't be caught. For my needs, this wasn't a big deal. You could always run the script more often to have a better chance of catching more changes.
The final piece of the puzzle was to send out a daily email to the science team to notify them of the changes. For this, I developed another script that is run once a day:
If you can grok that in a single glance, you're a better shell scripter than me. It took me a couple passes to write the script and get it working the way I wanted it to. There's a bit of magic going on here, but I'll break it down.
This script walks through a set of repositories like in the previous script. The first magical incantation we run into is:
This line asks Mercurial to tell us the revision numbers for all changes in the last day (
If the LOG variable does contain something, then we need to send out an email to notify people of the changes. We start building up our email in
The first line simply prints out "
Finally the script adds a helpful legend to the email and sends it out.
Overall, it's a bit hacky, but it works. The team can continue to collaborate in a central location with the relative safety of using a VCS to track changes. The best part is they don't have to do anything different; the change tracking is all automatic. I've even had the occasion to revert inadvertent changes and deletions, so it was a good investment of an afternoon.
The only problem is that allowing read/write access to a large group of people means that something is going to get inadvertently changed or deleted. To combat this, I needed an automatic way to track changes that would allow me to revert or rollback any accidents.
The first step was to put the expedition data into a standard version control system. My VCS of choice is Mercurial, so I opted to use that. The initial import took a bit of time because there was about 30GB of files.
Once I had all of the data safely imported into a Mercurial repository, I needed a way to automatically detect and commit changes. I worked up a fairly simple shell script that gets run periodically by cron to check for and commit any changes:
#!/bin/sh

REPOS="/home/projects/sms/"
DATE=`date`

for r in $REPOS
do
 echo "Working on $r"

 # clean up temporary files
 find $r -type f -name "._*" \! -wholename "*.hg*" -exec rm {} \;

 # find changes
 hg addremove -R $r
 hg commit -m "Automated commit @ $DATE" -R $r
done
The script is relatively straightforward. It will walk through a list of repositories (in this case, only 1 is configured). Fore each repository, it first cleans any dangling WebDAV lock files outside of the Mercurial metadata directory. Then it runs
hg addremove to detect any added or deleted files. Finally it commits the changes with an automated commit message containing the current date and time.The script is configured to run periodically (hourly) by cron. This has the side effect that if the same file is modified two separate times within the same hour window, the intermediate changes won't be caught. For my needs, this wasn't a big deal. You could always run the script more often to have a better chance of catching more changes.
The final piece of the puzzle was to send out a daily email to the science team to notify them of the changes. For this, I developed another script that is run once a day:
#!/bin/sh

REPOS="/home/projects/sms/"
DATE=`date`

for r in $REPOS
do
 LOG=`hg log -d -1 --template '{rev}\n' -R $r`
 if [ -z "$LOG" ]; then
  echo "No changes"
 else
  echo -e "The following files have changed in the last 24 hours:\n" > /tmp/hg-tc-daily.log
  for c in $LOG
  do
   hg log --rev $c --template 'Changeset {rev} ({date|isodate}):\n' -R $r >> /tmp/hg-tc-daily.log
   hg status --rev `expr $c - 1`:$c -R $r >> /tmp/hg-tc-daily.log
   echo "" >> /tmp/hg-tc-daily.log
  done
  cat /home/projects/hg-tc/summary.legend >> /tmp/hg-tc-daily.log
  cat /tmp/hg-tc-daily.log | mail -s "Expedition Data Changes" foo@bar.com
 fi
done
If you can grok that in a single glance, you're a better shell scripter than me. It took me a couple passes to write the script and get it working the way I wanted it to. There's a bit of magic going on here, but I'll break it down.
This script walks through a set of repositories like in the previous script. The first magical incantation we run into is:
LOG=`hg log -d -1 --template '{rev}\n' -R $r`This line asks Mercurial to tell us the revision numbers for all changes in the last day (
-d -1) and stores them, one to a line, in the LOG variable. We then check to see whether the LOG variable contains anything. If it doesn't, then we're done and can exit. If the LOG variable does contain something, then we need to send out an email to notify people of the changes. We start building up our email in
/tmp/hg-tc-log. Next we walk through our list of revision numbers, and for each one we include some information using this incantation:
hg log --rev $c --template 'Changeset {rev} ({date|isodate}):\n' -R $r >> /tmp/hg-tc-daily.log
hg status --rev `expr $c - 1`:$c -R $r >> /tmp/hg-tc-daily.log
The first line simply prints out "
Changeset 53 (2008-03-04 15:01 -0600):" or something similar for every changeset that occurred in the last 24 hours. The second line prints out the list of changed files and the change type (added, deleted, modified) from the previous previous revision (--rev `expr $c - 1`:$c). Finally the script adds a helpful legend to the email and sends it out.
Overall, it's a bit hacky, but it works. The team can continue to collaborate in a central location with the relative safety of using a VCS to track changes. The best part is they don't have to do anything different; the change tracking is all automatic. I've even had the occasion to revert inadvertent changes and deletions, so it was a good investment of an afternoon.
Tuesday, March 04, 2008
rotateLeftAndFlipInSitu
Recently I was working with some large (200MB) vertically-oriented core images in Java. I needed a way to rotate these images CCW so they were horizontally-oriented and flip them vertically for display on an OpenGL canvas. It's a pretty easy task if you're using the Java2D API:
That snippet will rotate your image to the left. If you twiddle with the affine transform, you can also get it to flip the image for you. The only problem with this approach is that it requires you allocate a second image to hold the results of the transformation. So rotating a 200MB image actually requires 400MB of memory (give or take). This isn't a big deal if I only ever needed to rotate one large image at a time, but in the application, I didn't know how many large images the user was going to be working with at a time. So I decided to see if I could do the rotation in O(1) space complexity.
It turns out that this is actually a pretty difficult problem. It's been studied since the 70s under the guise of "in-situ transposition of a rectangular matrix". Once I found this out, it became a personal quest to come up with a solution. In the end, I was successful:
with pred() defined as:
This algorithm works. It'll rotate the image in place. Thus, if you could load the image in the first place, you shouldn't run out of memory when you rotate it.
With that being said, this approach is pretty naive. There are numerous optimizations that could be implemented, from increasing the amount of temporary storage you use to optimizing the look up so you spend less time spinning.
In the end, I didn't end up using the code in production. It was a fun exercise to work through, though.
       // get our dimensions
       final int w = image.getWidth();
       final int h = image.getHeight();

       // create our new image and graphics
       final BufferedImage out = new BufferedImage(h, w, image.getType());
       final Graphics2D g2 = out.createGraphics();

       // setup up an affine transformation
       final AffineTransform at = AffineTransform.getRotateInstance(Math
               .toRadians(-90.0), h / 2, w / 2);
       at.translate((h - w) / 2, (w - h) / 2);
       g2.drawRenderedImage(image, at);
       g2.dispose();
       return out;
That snippet will rotate your image to the left. If you twiddle with the affine transform, you can also get it to flip the image for you. The only problem with this approach is that it requires you allocate a second image to hold the results of the transformation. So rotating a 200MB image actually requires 400MB of memory (give or take). This isn't a big deal if I only ever needed to rotate one large image at a time, but in the application, I didn't know how many large images the user was going to be working with at a time. So I decided to see if I could do the rotation in O(1) space complexity.
It turns out that this is actually a pretty difficult problem. It's been studied since the 70s under the guise of "in-situ transposition of a rectangular matrix". Once I found this out, it became a personal quest to come up with a solution. In the end, I was successful:
  // get our sample model and data buffer
  final SampleModel model = image.getSampleModel();
  final DataBuffer db = image.getRaster().getDataBuffer();

  final int w = model.getWidth();
  final int h = model.getHeight();
  final int[] t1 = new int[model.getNumBands()];
  final int[] t2 = new int[model.getNumBands()];

  // transpose
  int i, j, k, movesLeft;
  for (i = 0, movesLeft = w * h; movesLeft > 0; i++) {
   for (j = pred(i, w, h); j > i; j = pred(j, w, h)) {
    // spin
   }

   if (j < i) {
    continue;
   }
   for (k = i, j = pred(i, w, h); j != i; k = j, j = pred(j, w, h)) {
    // get our pixels
    model.getPixel(k % w, k / w, t1, db);
    model.getPixel(j % w, j / w, t2, db);

    // swap them
    model.setPixel(k % w, k / w, t2, db);
    model.setPixel(j % w, j / w, t1, db);
    --movesLeft;
   }
   --movesLeft;
  }

  // now return a new image with an updated sample model
  final WritableRaster raster = Raster.createWritableRaster(model
    .createCompatibleSampleModel(h, w), db, null);
  return new BufferedImage(image.getColorModel(), raster, image
    .isAlphaPremultiplied(), null);
with pred() defined as:
return (i % h) * w + (i / h);
This algorithm works. It'll rotate the image in place. Thus, if you could load the image in the first place, you shouldn't run out of memory when you rotate it.
With that being said, this approach is pretty naive. There are numerous optimizations that could be implemented, from increasing the amount of temporary storage you use to optimizing the look up so you spend less time spinning.
In the end, I didn't end up using the code in production. It was a fun exercise to work through, though.
Wedding Update
Our wedding plans are progressing nicely. The actual wedding is on April 19th in the Bahamas (Euleuthera Island). It's going to be small; only a few family and friends. We're all flying down there on Thursday, the 17th. We'll have Thursday afternoon, all day Friday, and most of the day Saturday to relax and hang out. The actual wedding ceremony is going to be pretty low key. We're going to be married on the beach in late afternoon on Saturday. For the honeymoon, Elizabeth and I have rented a little house on a private beach for the following week. We return to the real world on the 27th, and a couple weeks after that, on May 16th, we're going to have a reception in St. Paul.
A blog reborn...
It's about time I reclaim this blog from dormancy. It's been a hectic couple of months since I returned from the ice. Things, however, are progressing well so it's about time I start blogging again. I'm changing the name of this blog to "Josh (Formerly) In Antarctica" as there are no Antarctic trips in the foreseeable future. I'm going to keep the blog format the same--pretty informal with a mix of personal and technical entries. I may even start tagging my posts so folks who are only interested in technical content don't have to wade through all of my posts.
Subscribe to:
Posts (Atom)
